


LuckyMike
Member
One of my main projects this winter is to mount up my son's bull elk which he took last fall in the Montana archery season. I used to be a part time taxidermist and mounted commercially for other people. However, I retired from doing business about ten years ago. Currently I mount only for myself and occasionally for members of the family. I am creating this thread as a "show and tell" to share with you what goes into a full shoulder elk mount.
After recieving the tanned elk cape and the foam form I ordered based on measurements around the neck and from the corner of the eye to the end of the nose, I soaked up the hide in room temperature water, drained it and did a trial fit on the form.


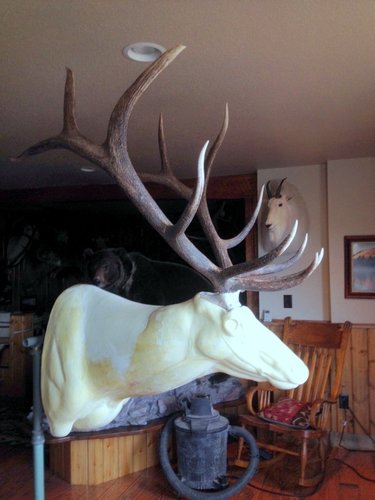
After determining that the form was basically OK and knowing I could modify it to create a perfect fit for the cape, I attached the skull cap and antlers. These were fastened to the form with large wood screws anchored into the block of wood imbedded in the foam form.

We then took the form with antlers attached over to my son's house and checked the clearances on an upper wall he wants to hang the finished mount on. It fit! our little test also verified we could get the finished mount into his house and out of mine. Note that I could not get it out of my little shop in my walkout basement. So, I'll have to mount it in the rec room in my basement. Good to know ahead of time!

Once I was certain everything was a go with the form and the spot he was going to hang the mount, I was ready to modify the form by beefing up the middle section of the neck.

I used foam in the liquid state and mixed the resin and catalyst in small amounts to over fill the area I wanted to expand. Then once the foam had hardened I carved it to the approximate size and shape I wanted. The patch was finished by rasping and sanding to achieve the contours and smoothness desired. The next step was to try the cape on again. It very nearly fit with that first try. With just a little more rasping and sanding it was ready. I moved my operation into the rec room. With the form attached to a stand I then attached the skull plate and antlers with some minor adjustments to assure that I had proper symmetry and angles were correct.
After recieving the tanned elk cape and the foam form I ordered based on measurements around the neck and from the corner of the eye to the end of the nose, I soaked up the hide in room temperature water, drained it and did a trial fit on the form.
After determining that the form was basically OK and knowing I could modify it to create a perfect fit for the cape, I attached the skull cap and antlers. These were fastened to the form with large wood screws anchored into the block of wood imbedded in the foam form.
We then took the form with antlers attached over to my son's house and checked the clearances on an upper wall he wants to hang the finished mount on. It fit! our little test also verified we could get the finished mount into his house and out of mine. Note that I could not get it out of my little shop in my walkout basement. So, I'll have to mount it in the rec room in my basement. Good to know ahead of time!
Once I was certain everything was a go with the form and the spot he was going to hang the mount, I was ready to modify the form by beefing up the middle section of the neck.
I used foam in the liquid state and mixed the resin and catalyst in small amounts to over fill the area I wanted to expand. Then once the foam had hardened I carved it to the approximate size and shape I wanted. The patch was finished by rasping and sanding to achieve the contours and smoothness desired. The next step was to try the cape on again. It very nearly fit with that first try. With just a little more rasping and sanding it was ready. I moved my operation into the rec room. With the form attached to a stand I then attached the skull plate and antlers with some minor adjustments to assure that I had proper symmetry and angles were correct.


 Smartassery aside, really cool project to take on for your son's bull.